
Themes and Plugins: What They Are and How to Use Them

Introduction Once your WordPress site is installed and you’re inside the dashboard, two of the most powerful tools at your disposal are Themes and Plugins. These features allow you to customize the appearance and functionality of your website without writing a single line of code. In this blog, we’ll explore what Themes and Plugins are, how they work, and how to use them effectively. What Are WordPress Themes? A WordPress Theme controls the design, layout, and visual appearance of your website. From colors and typography to page structure and widget positions, your theme determines how visitors experience your site. Types of Themes: Popular Free Themes: How to Install a Theme in WordPress You can also upload a theme manually by clicking “Upload Theme” and selecting a .zip file. 🔧 Customize Your Theme: Go to Appearance > Customize to change: What Are WordPress Plugins? A Plugin is a piece of software that adds new features and functionality to your WordPress site. Think of it like installing apps on your phone. Types of Plugins: How to Install a Plugin in WordPress You can also upload plugins manually using the “Upload Plugin” button and selecting a .zip file. Tips for Using Themes and Plugins Wisely ✔ Only use trusted themes/plugins with good ratings and regular updates✔ Don’t overload your site with too many plugins—it can slow it down✔ Keep everything updated for performance and security✔ Always backup your site before adding a new theme or plugin Conclusion Themes and plugins are what make WordPress so powerful and flexible. With the right combination, you can build almost any type of website—from a simple blog to a complex online store. Take your time exploring different options and customize your site to fit your brand. 🚀 Remember: Design attracts, functionality retains. Use both smartly! SEO-Friendly Tags #WordPressThemes #WordPressPlugins #CustomizeWordPress #WebDesign #WordPressGuide #WordPressForBeginners #LearnWordPress #WPDevelopment
What is WordPress? A Beginner’s Guide

Introduction If you’ve ever thought about building a website, chances are you’ve heard of WordPress. But what exactly is it? In this beginner-friendly guide, we’ll break down what WordPress is, why it’s so popular, and how you can use it to create your very own website—without needing to know how to code. What is WordPress? WordPress is an open-source content management system (CMS) that allows you to build and manage websites easily. It was first released in 2003 and has grown to power over 40% of all websites on the internet today. There are two versions: Why is WordPress So Popular? ✔ User-Friendly Interface – You don’t need to be a tech expert to use it.✔ Flexible & Customizable – Thousands of themes and plugins available.✔ SEO-Friendly – Built to help your site rank on search engines.✔ Secure & Scalable – Ideal for blogs, business sites, and even eCommerce.✔ Large Community Support – Tons of tutorials, forums, and help available. What Can You Build With WordPress? Basic Features of WordPress Getting Started with WordPress To start using WordPress.org, you need: Tips for Beginners Conclusion WordPress is the perfect platform for beginners who want to build a website without diving deep into coding. It’s powerful, flexible, and backed by a massive community. Whether you’re starting a blog, launching a business, or opening an online store, WordPress gives you the tools to succeed. Ready to start your website journey? WordPress is just a few clicks away!
Best Practices for Writing Clean and Efficient Code
Introduction In frontend development, writing clean and efficient code is just as important as creating visually stunning interfaces. Well-written code improves readability, performance, and collaboration. Whether you’re a beginner or a seasoned developer, following best practices ensures that your codebase is easy to manage and scalable. In this final blog of our frontend series, we’ll explore essential tips and techniques to help you write clean and efficient code using HTML, CSS, and JavaScript. 1. Use Semantic HTML Semantic HTML elements like <header>, <footer>, <article>, and <section> make your code more readable and improve accessibility and SEO. ✅ Example: 2. Keep CSS Organized and Reusable ✅ Example: 3. Write Modular JavaScript Break your JavaScript into smaller functions and modules. Each function should have a single responsibility. ✅ Example: 4. Follow Consistent Naming Conventions Use meaningful and consistent names for variables, functions, and classes. ✅ Example: 5. Avoid Repetition (DRY Principle) DRY = Don’t Repeat Yourself. Reuse code where possible. ✅ Example: 6. Comment Smartly Add comments only where necessary. Let the code speak for itself when it’s self-explanatory. ✅ Example: 7. Minify and Optimize Code for Production Use tools to remove whitespace, unused code, and compress files for faster loading. 8. Test Your Code Always test your UI and scripts across different browsers and devices. Conclusion Clean code isn’t just about style—it’s about writing code that’s readable, maintainable, and scalable. By following these best practices, you’ll not only improve your own workflow but also contribute to better team collaboration and smoother project delivery. 🎯 Keep practicing and keep coding clean! Your future self (and team) will thank you.
Understanding JavaScript Frameworks Like React and Vue

Introduction JavaScript has become the backbone of modern web development, and with that, JavaScript frameworks like React and Vue have risen in popularity. These tools simplify the process of building dynamic and interactive user interfaces. If you’re a beginner or transitioning from vanilla JavaScript, understanding these frameworks is essential for scaling your skills. What Are JavaScript Frameworks? JavaScript frameworks and libraries are tools that help developers write better, more maintainable code. They provide structure, reusable components, and built-in features to handle complex UI behaviors with less effort. ✔ React and Vue are two of the most widely used JavaScript libraries/frameworks for building front-end user interfaces.✔ They allow for component-based development, where the UI is broken into small, reusable parts.✔ Both support reactivity, virtual DOM, and seamless integration with backend APIs. What is React? React is a JavaScript library developed by Facebook for building user interfaces. It’s component-based, declarative, and used to create fast and scalable web applications. Key Features of React: Example React Component: What is Vue? Vue.js is a progressive JavaScript framework created by Evan You. It’s known for being lightweight, beginner-friendly, and highly adaptable. Key Features of Vue: Example Vue Component: React vs Vue – A Quick Comparison Feature React Vue Learning Curve Moderate Easy Community Support Very large Growing rapidly Performance Excellent Excellent Flexibility High High Syntax JSX (JavaScript + HTML) HTML templates + directives When Should You Use React or Vue? ✅ Use React if: ✅ Use Vue if: Conclusion Both React and Vue are powerful tools that can take your front-end development to the next level. They each have their strengths and are widely used across the tech industry. Whether you choose React or Vue, you’re on the right path to becoming a skilled modern web developer. 🚀 Start small, build components, and watch your UI come to life!
Adding Animations and Transitions Using CSS and JavaScript

Introduction Animations and transitions can transform a static website into an engaging, dynamic experience. With CSS and JavaScript, you can create smooth animations, hover effects, and interactive transitions that captivate your users. In this blog, we will explore how to easily add animations and transitions to your website. What are Animations and Transitions? ✔ CSS Transitions: Smoothly change an element’s style over a set duration.✔ CSS Animations: Create complex, keyframe-based animations without JavaScript.✔ JavaScript Animations: Offer complete control for advanced, dynamic effects. 1. CSS Transitions: Smooth and Easy CSS transitions allow you to change an element’s properties over a specified duration, making interactions look natural. Example: Hover Effect with CSS Transition Explanation: ✔ The transition property allows smooth changes on hover.✔ The button changes color from blue to dark blue with a smooth effect. 2. CSS Animations: Advanced Effects with Keyframes CSS animations are more powerful because they use keyframes to define the animation stages. Example: CSS Animation with Keyframes Explanation: ✔ The @keyframes rule defines the animation stages (start and end positions).✔ The box moves back and forth automatically. 3. JavaScript Animations: Complete Control JavaScript allows for more complex and interactive animations. You can trigger animations based on user actions, scroll, or any event. Example: JavaScript Animation with Event Explanation: ✔ The circle moves when clicked, creating an interactive effect.✔ JavaScript provides more flexibility for complex animations. Best Practices for Animations and Transitions ✔ Use CSS for simple hover effects and keyframe animations.✔ Use JavaScript for interactive, dynamic animations.✔ Keep animations smooth (0.3s to 1s) for a better user experience.✔ Avoid excessive animations to maintain performance. Common Animation Properties in CSS Property Description transition Smoothly change property values animation Define keyframe animations transform Scale, rotate, or move elements opacity Change visibility (fade in/out) Conclusion Adding animations and transitions with CSS and JavaScript can make your website more engaging and interactive. Start with simple hover effects, then experiment with keyframes and JavaScript to create dynamic interactions. Would you like me to show you how to create an animated loading screen next? 🚀
Building Your First Simple Webpage Using HTML, CSS, and JavaScript
Introduction Creating your first simple webpage is an exciting step in your journey to becoming a web developer. With HTML, CSS, and JavaScript, you can build a fully functional and visually appealing website. In this guide, we will walk you through the process of building your first webpage from scratch. Step 1: Setting Up Your HTML Structure HTML (HyperText Markup Language) is the foundation of any webpage. It provides the basic structure and content of the website. HTML Code: Explanation: ✔ The <h1> tag is used for the main heading.✔ The <p> tag is used for a paragraph of text.✔ The <title> tag sets the title of the page shown in the browser tab. Step 2: Adding Style with CSS CSS (Cascading Style Sheets) makes your webpage look visually appealing. We will add CSS to style the text, background, and layout. CSS Code: Explanation: ✔ The background-color changes the page background color.✔ The font-family makes the text look clean and readable.✔ The text-align: center centers the content. Step 3: Adding Interactivity with JavaScript JavaScript allows you to make your webpage interactive. We will add a button that changes the text when clicked. JavaScript Code: Explanation: ✔ The changeText() function changes the heading text when called.✔ We will add a button to trigger this function. Complete Code (HTML + CSS + JavaScript): Step 4: Saving and Viewing Your Webpage 1️⃣ Save your file as index.html on your desktop.2️⃣ Double-click the file to open it in your browser.3️⃣ Click the button to see the JavaScript in action. Congratulations! 🎉 You have successfully built your first webpage using HTML, CSS, and JavaScript. Keep experimenting, add more styles, and explore JavaScript features to make your webpage more interactive. Would you like to learn how to make this page mobile-friendly or add animations next? Stay tuned! 🚀
How HTML, CSS, and JavaScript Work Together

Introduction In the world of web development, three core technologies work together to create the websites we use every day: HTML, CSS, and JavaScript. Whether you are building a simple website or a complex web application, understanding how these three work together is essential for any web developer. This blog will explain how HTML, CSS, and JavaScript combine to build fully functional websites. By the end of this post, you will have a clear understanding of their roles and how they enhance each other. What is HTML? (Structure) HTML (HyperText Markup Language) is the skeleton of a website. It provides the basic structure and content, such as text, images, headings, and links. ✔ HTML is the foundation of every webpage.✔ It uses tags like <h1>, <p>, <img>, and <a> to organize content.✔ Without HTML, there would be no structure to display on the web. Example: What is CSS? (Presentation) CSS (Cascading Style Sheets) is used to style the HTML structure, making it visually appealing. CSS controls the colors, fonts, layout, and overall design of a website. ✔ CSS makes websites look beautiful and user-friendly.✔ It uses selectors to target HTML elements and apply styles.✔ Without CSS, websites would be plain and unstyled. Example: What is JavaScript? (Interactivity) JavaScript is a programming language that adds interactivity and dynamic behavior to a website. It allows you to create animations, form validations, dynamic content updates, and much more. ✔ JavaScript makes websites interactive and functional.✔ It can modify HTML and CSS in real-time.✔ Without JavaScript, websites would be static. Example: How HTML, CSS, and JavaScript Work Together The three technologies work in harmony: 1️⃣ HTML provides the structure: A basic layout with headings, text, images, and links.2️⃣ CSS enhances the presentation: Adds colors, fonts, layouts, and animations.3️⃣ JavaScript adds interactivity: Allows user actions like clicks, form submissions, and animations. Example – A Complete Web Page: Why Understanding Their Relationship is Important ✔ Efficient Development: You will know which technology to use for each task.✔ Debugging Made Easy: Understand where issues might be (HTML structure, CSS styles, or JS behavior).✔ Better Web Design: Create beautiful, functional, and user-friendly websites. Common Mistakes to Avoid ❌ Overloading JavaScript: Using JS for simple tasks that CSS can handle (like hover effects).❌ Poor HTML Structure: Incorrectly using tags like <div> instead of semantic tags (<header>, <footer>, <section>).❌ Inline CSS and JavaScript: Always keep CSS and JS in separate files for clean code. Conclusion HTML, CSS, and JavaScript are the three core technologies of the web. Understanding how they work together is the first step toward becoming a successful web developer. With HTML providing structure, CSS adding style, and JavaScript bringing interactivity, you can create websites that are beautiful, responsive, and engaging. Ready to build amazing websites? Start experimenting with HTML, CSS, and JavaScript today! 🚀
DOM Manipulation: How JavaScript Interacts with HTML & CSS

Introduction The Document Object Model (DOM) is a crucial part of web development that allows JavaScript to interact with HTML and CSS dynamically. With DOM manipulation, developers can update content, change styles, and respond to user interactions in real time. In this blog, we’ll explore what the DOM is, how JavaScript interacts with it, and the key methods used for DOM manipulation. What is the DOM? The DOM (Document Object Model) represents an HTML document as a tree structure, where each element is a node. This allows JavaScript to access, modify, and update the page dynamically. ✔ HTML is parsed into a structured tree of elements.✔ JavaScript can select, modify, and delete elements.✔ Changes are reflected instantly on the webpage. Selecting Elements in the DOM To manipulate the DOM, we first need to select elements. JavaScript provides multiple methods to do this: 1. Selecting by ID 2. Selecting by Class 3. Selecting by Tag Name 4. Selecting with Query Selectors (Modern & Recommended) Modifying HTML Content JavaScript allows us to change text, HTML structure, and attributes dynamically: 1. Changing Text Content 2. Changing HTML Structure 3. Changing Element Attributes Modifying CSS Styles JavaScript can dynamically change CSS properties: 1. Changing Individual Styles 2. Adding or Removing CSS Classes Creating and Removing Elements Dynamically We can add or remove elements using JavaScript to update the page structure. 1. Creating New Elements 2. Removing Elements Event-Driven DOM Manipulation JavaScript allows us to interact with the user through event listeners: 1. Handling Click Events 2. Handling Input Events Best Practices for DOM Manipulation ✔ Minimize direct DOM manipulations to improve performance.✔ **Use **documentFragment to batch updates efficiently.✔ Optimize event listeners to avoid memory leaks.✔ Prefer classList over direct style manipulation for maintainability. Conclusion Understanding DOM manipulation allows developers to build dynamic, interactive, and engaging web applications. By mastering element selection, content modification, CSS styling, and event handling, you can create websites that respond to user actions seamlessly. Start experimenting with JavaScript and make your webpages come alive! 🚀 SEO-Friendly Tags #JavaScript #DOMManipulation #FrontendDevelopment #WebDevelopment #LearnJavaScript #InteractiveWeb #JSFunctions #UIUX
JavaScript Events: How to Make Your Website Interactive

Introduction JavaScript events play a crucial role in making websites interactive and dynamic. Events allow users to engage with a webpage by clicking buttons, submitting forms, hovering over elements, or pressing keys. In this blog, we’ll explore what JavaScript events are, how they work, and how you can use them to enhance user experience. What are JavaScript Events? Events are actions or occurrences that happen in the browser when users interact with a webpage. JavaScript allows developers to detect these events and execute specific code in response. ✔ Example of Events: Clicking a button, moving the mouse, pressing a key, submitting a form. ✔ Why Use Events? To improve user engagement, create interactive interfaces, and enhance functionality. Types of JavaScript Events JavaScript provides several types of events to capture user interactions: 1. Mouse Events (Triggered by user mouse actions) Event Description click Fires when an element is clicked dblclick Fires when an element is double-clicked mouseover Triggers when the mouse enters an element mouseout Fires when the mouse leaves an element mousemove Fires when the mouse moves inside an element Example: 2. Keyboard Events (Triggered by user keyboard actions) Event Description keydown Fires when a key is pressed down keyup Fires when a key is released keypress Fires when a key is pressed and released Example: 3. Form Events (Triggered by user actions on forms) Event Description submit Fires when a form is submitted focus Triggers when an input field is focused blur Fires when an input field loses focus change Fires when an input field value is changed Example: How to Add Event Listeners in JavaScript There are multiple ways to attach event listeners in JavaScript: 1. Inline Event Handlers (Not Recommended) Adding events directly in HTML elements: 2. JavaScript Event Listener (Recommended) Using addEventListener() to attach events: 3. Event Object in JavaScript The event object contains details about the event: Best Practices for Using JavaScript Events ✔ Use addEventListener() instead of inline event handlers for better structure.✔ Use event delegation for handling multiple elements efficiently.✔ Prevent unnecessary page reloads using event.preventDefault().✔ Keep event listeners clean and remove them when no longer needed. Conclusion JavaScript events are essential for building interactive, dynamic, and user-friendly websites. By mastering different event types and handling methods, developers can create engaging web experiences that respond to user actions efficiently. Start experimenting with JavaScript events today to make your websites more interactive! 🚀
Introduction to JavaScript Functions: How They Work
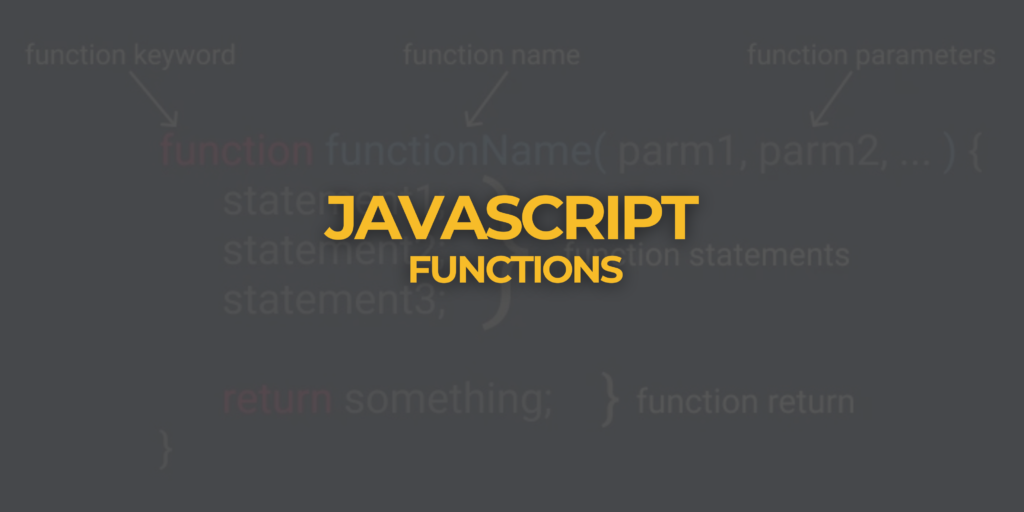
Introduction JavaScript is a powerful programming language that enables interactivity on websites. One of its most important features is functions, which help organize code, make it reusable, and improve efficiency. In this blog, we will explore what JavaScript functions are, how they work, and why they are essential in web development. What is a JavaScript Function? A function is a block of reusable code designed to perform a specific task. Instead of writing the same code multiple times, functions allow you to define the logic once and execute it whenever needed. Why Use Functions in JavaScript? ✔ Code Reusability – Write a function once and use it multiple times.✔ Better Organization – Helps structure code for readability and maintenance.✔ Improved Performance – Reduces repetition, making code efficient.✔ Modularity – Makes debugging and updating easier. How to Declare a Function in JavaScript JavaScript provides different ways to declare functions: 1. Function Declaration (Named Function) A function is defined using the function keyword followed by a name. Output: Hello, welcome to JavaScript! 2. Function Expression (Anonymous Function) A function can be assigned to a variable. 3. Arrow Function (ES6) A modern and concise way to define functions. Function Parameters and Arguments Functions can accept parameters, allowing dynamic input. Output: Hello, John! You can also pass multiple parameters: Output: 15 JavaScript Function Return Values A function can return a value using the return statement. Types of JavaScript Functions 1️⃣ Built-in Functions – Predefined functions like alert(), parseInt(), Math.max()2️⃣ User-Defined Functions – Custom functions created by developers3️⃣ Anonymous Functions – Functions without a name, often used in callbacks4️⃣ Arrow Functions – Shorter syntax for writing functions Conclusion JavaScript functions are essential for structuring, reusing, and optimizing code. Understanding how they work will help you write cleaner and more efficient programs. Whether you are building a simple webpage or a complex web application, functions play a key role in JavaScript programming. Stay tuned for more JavaScript tutorials! 🚀 SEO-Friendly Tags #JavaScriptFunctions #WebDevelopment #LearnJavaScript #ProgrammingBasics #JSFunctions #CodingTutorial #FrontendDevelopment #JavaScript


